The candlestick course · lesson five of six · Zonetta Trading
Find the formation
Ten charts, and one question each. Nothing here is new — every formation on this page was taught in lessons two and three. This lesson is where you find out whether you can actually see them.
Written lesson · about sixteen minutes · free, and it asks for nothing
01 / How this works
Look, name it, then open the answer
Every plate below is a chart with the labels taken off. Each one ends on a formation, and your job is to name it and say which candles carry it. Then open the answer and find out.
Each drill carries a ten-second clock you can start if you want the pressure. It is a visual pacer and nothing more: it hides nothing, it reveals nothing, and no answer on this page is on a timer.The ten-second clock that normally sits on each drill is not shown, because your browser is set to reduce motion. Nothing else about the lesson changes: every answer opens the same way.
Two of the ten plates carry a shape that almost qualifies and does not. They are there on purpose. Nearly is not a formation, and the fastest way to learn that is to be caught by it once on a chart where it costs nothing.
If you are reading with a screen reader: every plate is described in words, and the description is written so it does not hand you the answer. A description cannot make you measure one candle against another the way the picture does, so open the answers whenever you like. Nothing here is scored and nothing is withheld.
Printing this? You get a clean ten-question worksheet. The answers stay closed on paper, which is what you want and is worth knowing in advance so a blank space does not read as a broken page.
The key · teal and navy
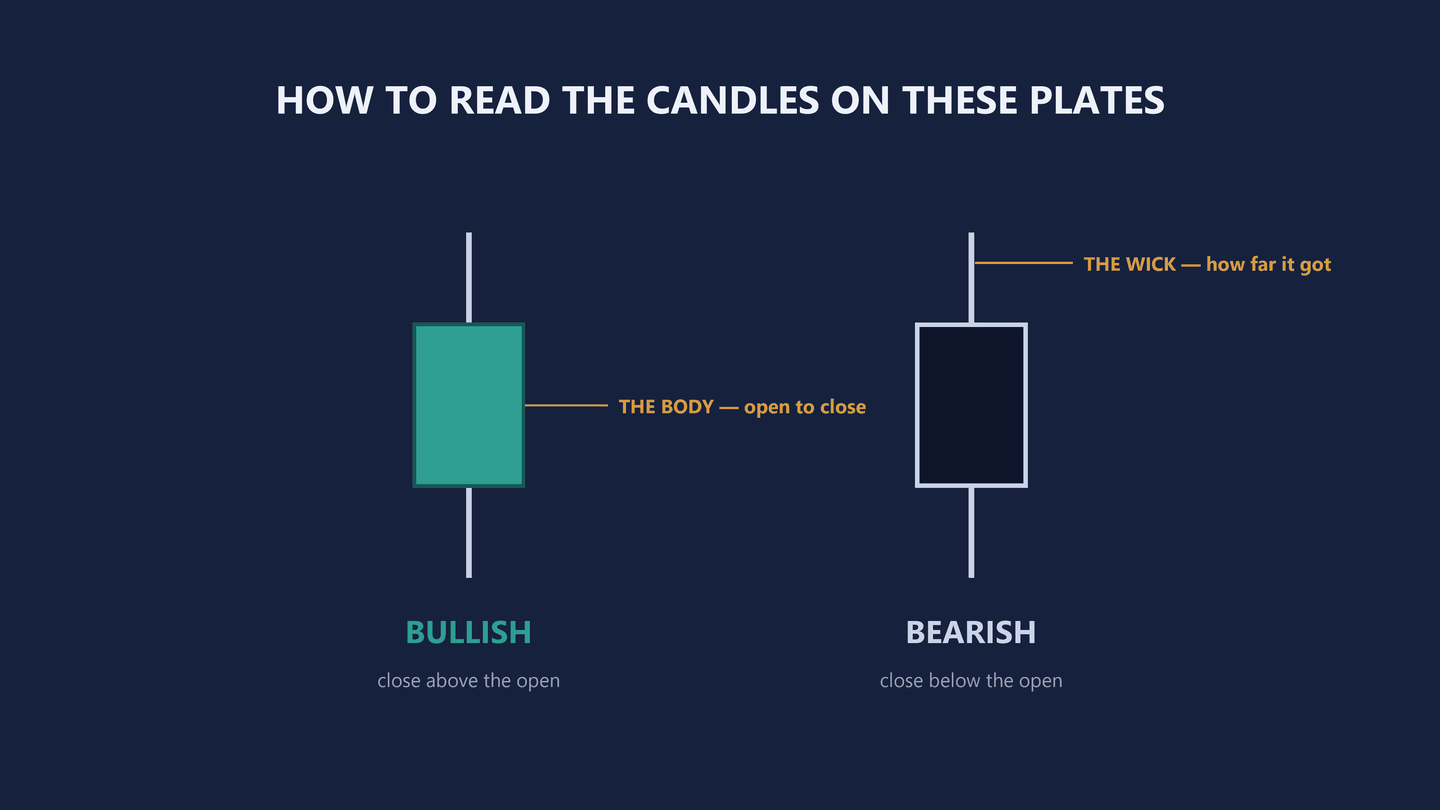
Diagram only · no instrument, no price, no outcome claimed
02 / Drills one to five
Five plates, three of them mirrors of each other
Take them in order. Drills one and five are the pair worth the most attention on this page: at a glance they are the same picture, and only one measurement separates them.
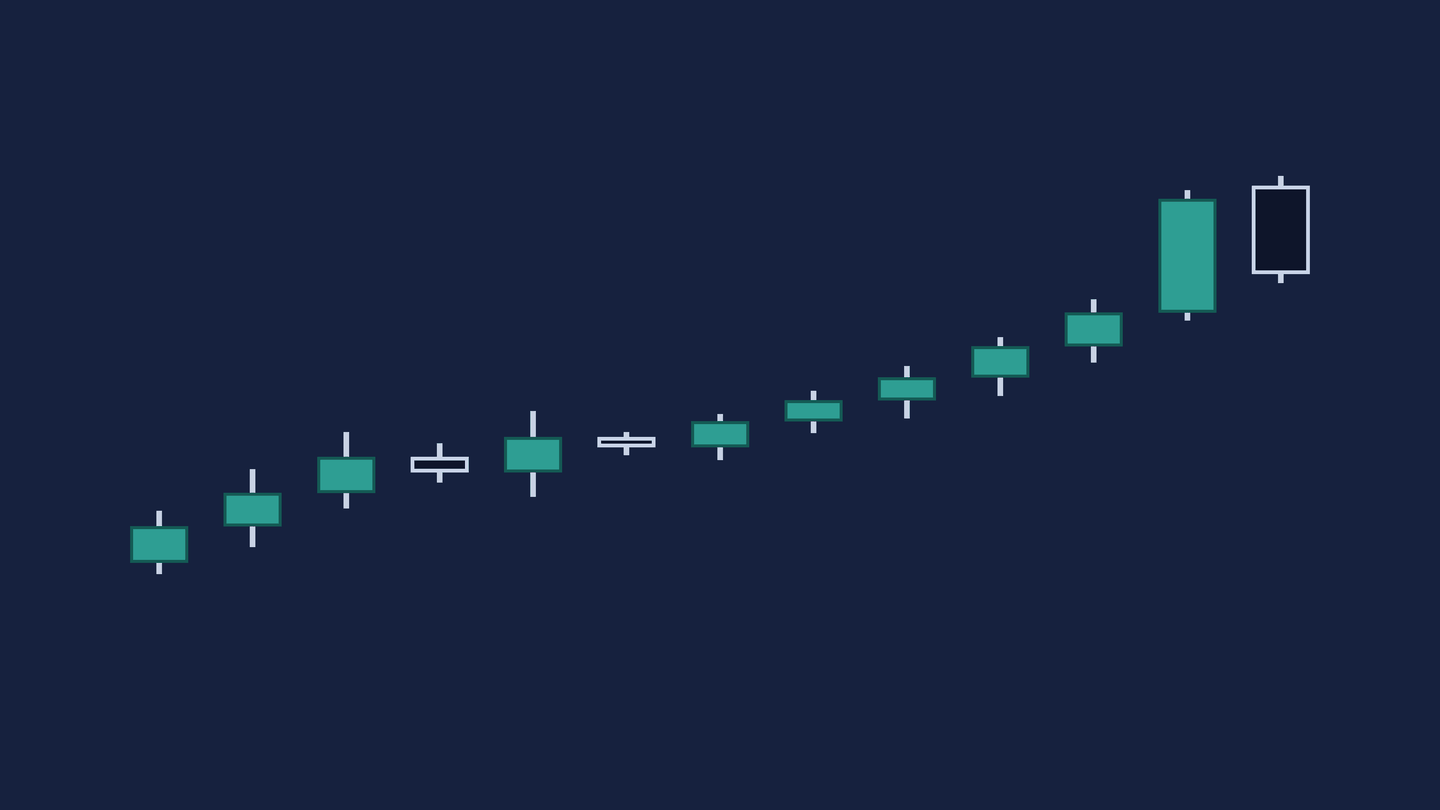
Drill 01 · thirteen candles
Show the answer
Dark cloud cover · candles twelve and thirteen
Candle twelve is the strong bullish move. Candle thirteen opens above where twelve closed, turns over, and closes below the middle of candle twelve's body. Measure against the middle of the body, not against the wick. The deeper the second body cuts past that middle, the more the warning is worth.
Now check what it is not, because that is the whole exercise. A bearish engulfing has to close below the opening of the candle in front of it. This one stops partway down. Close shape, different name, different weight: dark cloud cover is a two-candle warning from lesson two, not one of the six formations from lesson three.
Warning first. Confirmation second. Trade third, and never in another order.
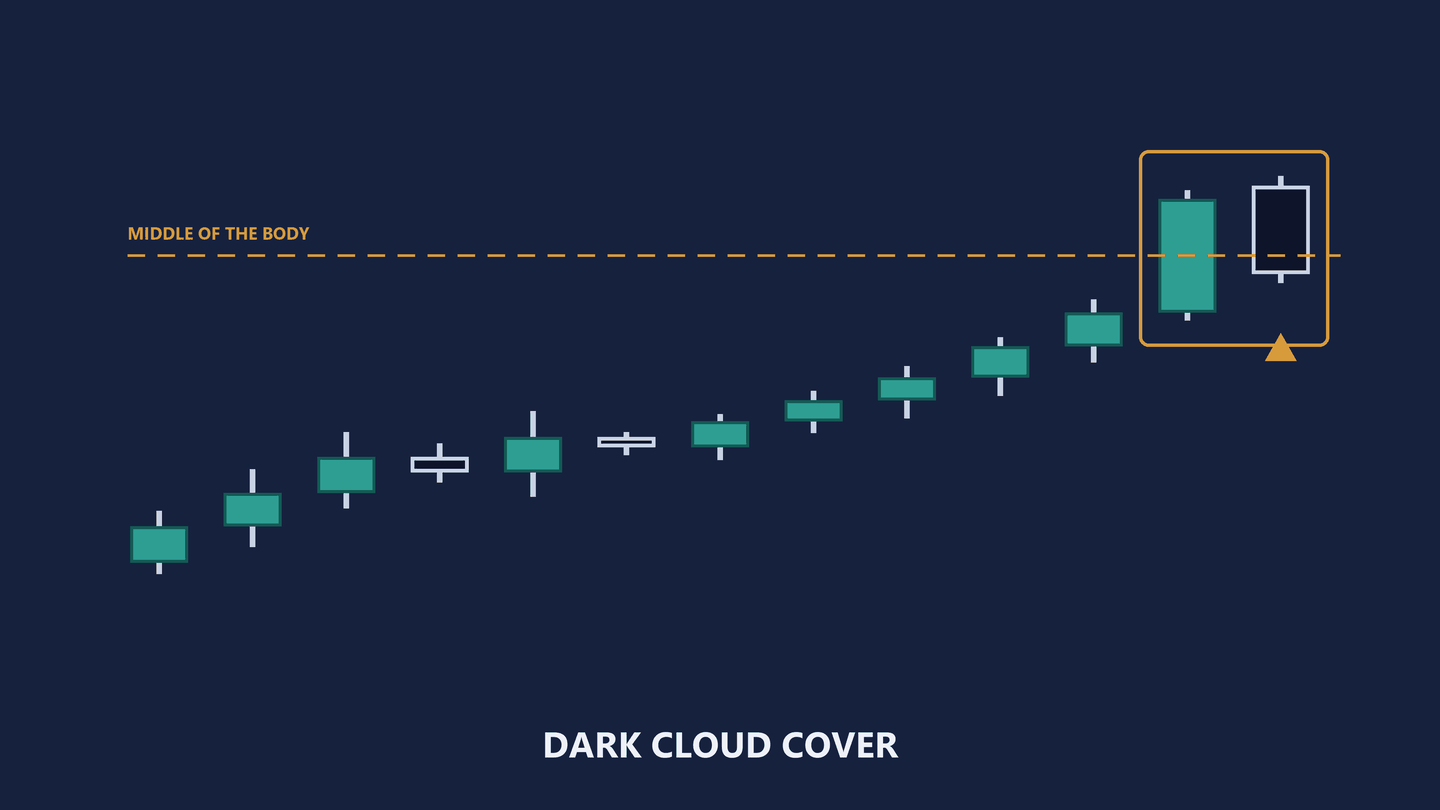
Diagram only · no instrument, no price, no outcome claimed
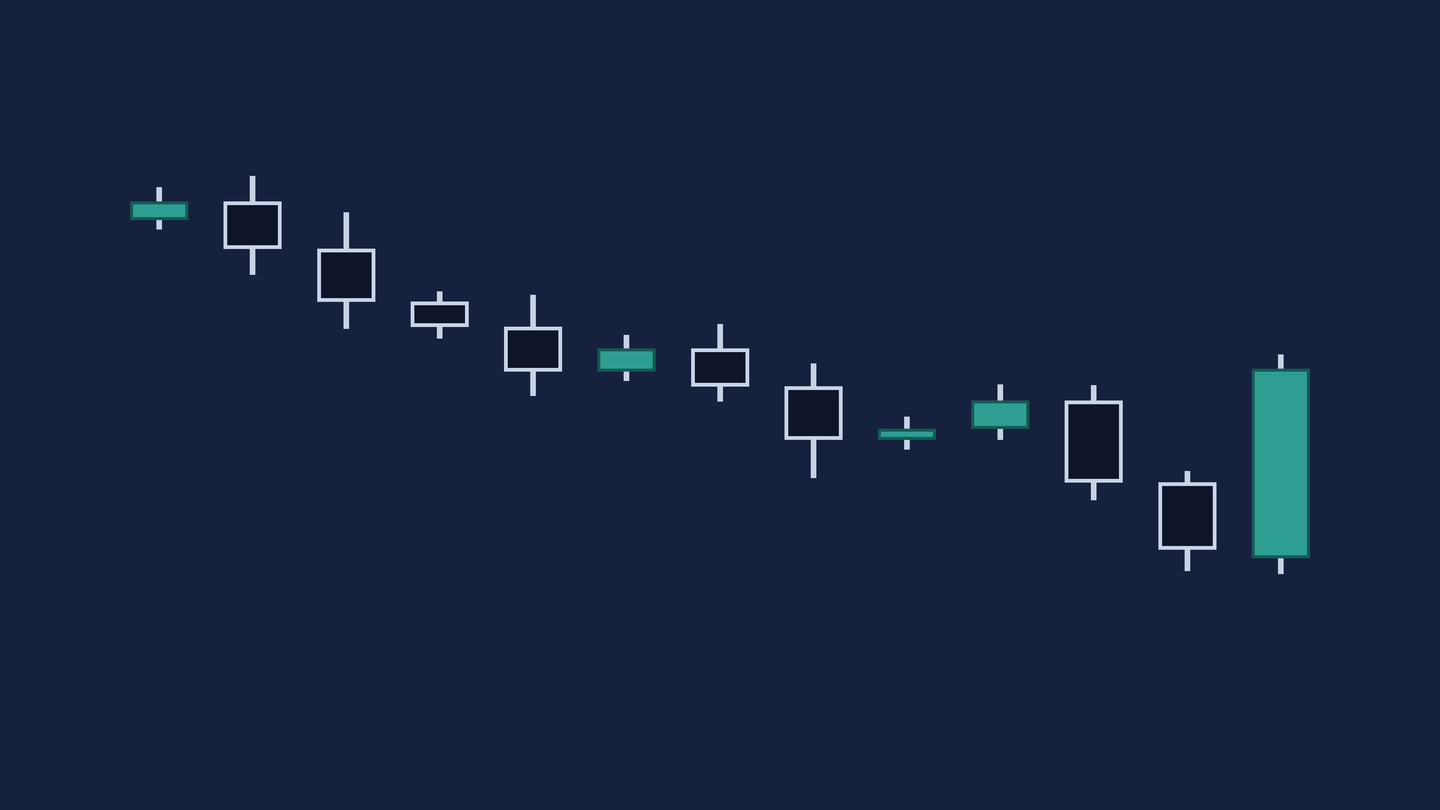
Drill 02 · thirteen candles
Show the answer
Bullish engulfing · candles eleven, twelve and thirteen
Candle thirteen opens at or under where candle twelve closed and closes above where candle eleven opened. One body has covered both of the bodies before it.
Check both ends before you call it, which is the instruction lesson three gave you: the open at or under the previous close, and the close above the previous open. Traders call this one on the close alone and get it wrong regularly.
Engulfing more than one prior body is normal and it is not a disqualifier. What matters is that a single decision erased the ones before it.
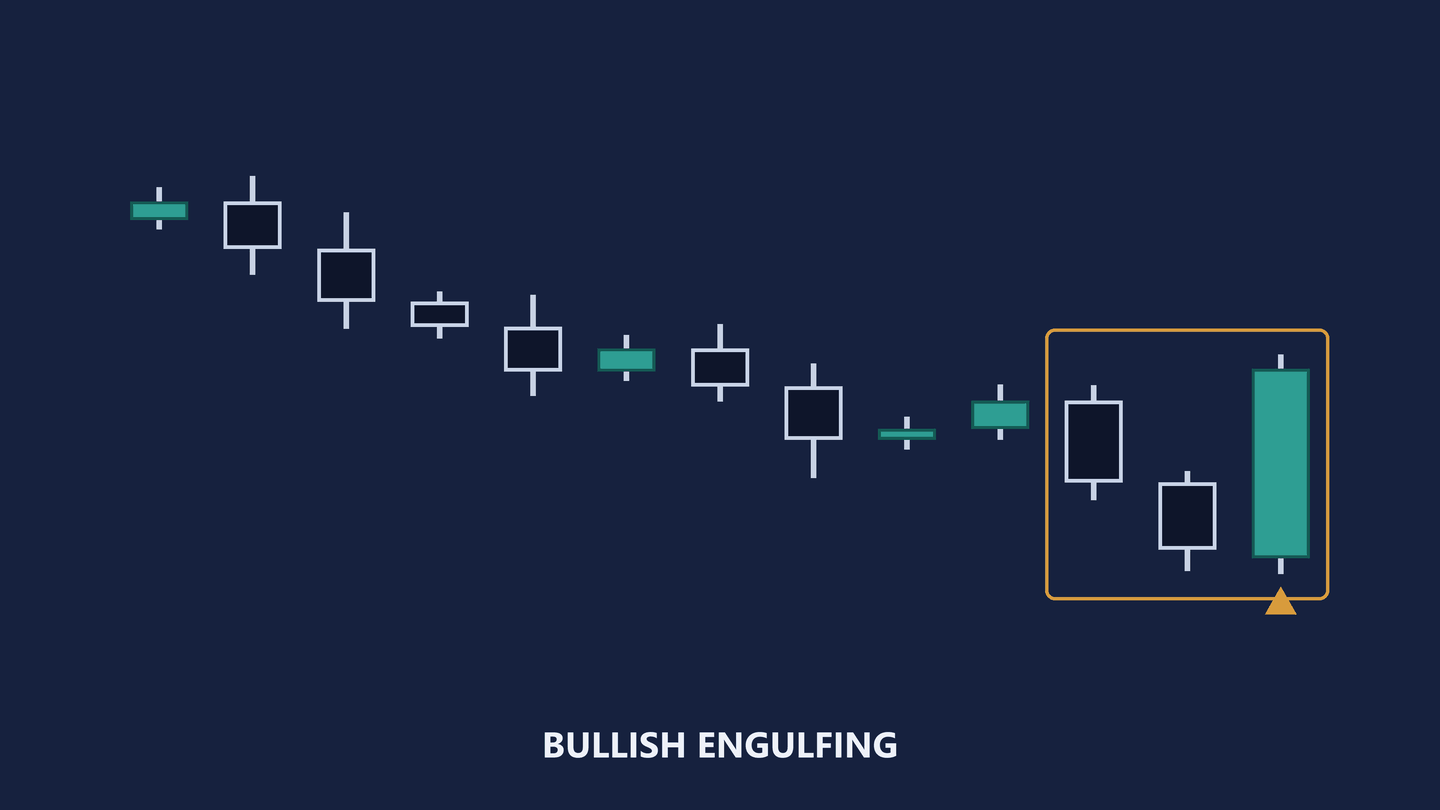
Diagram only · no instrument, no price, no outcome claimed
Drill 03 · fourteen candles
Show the answer
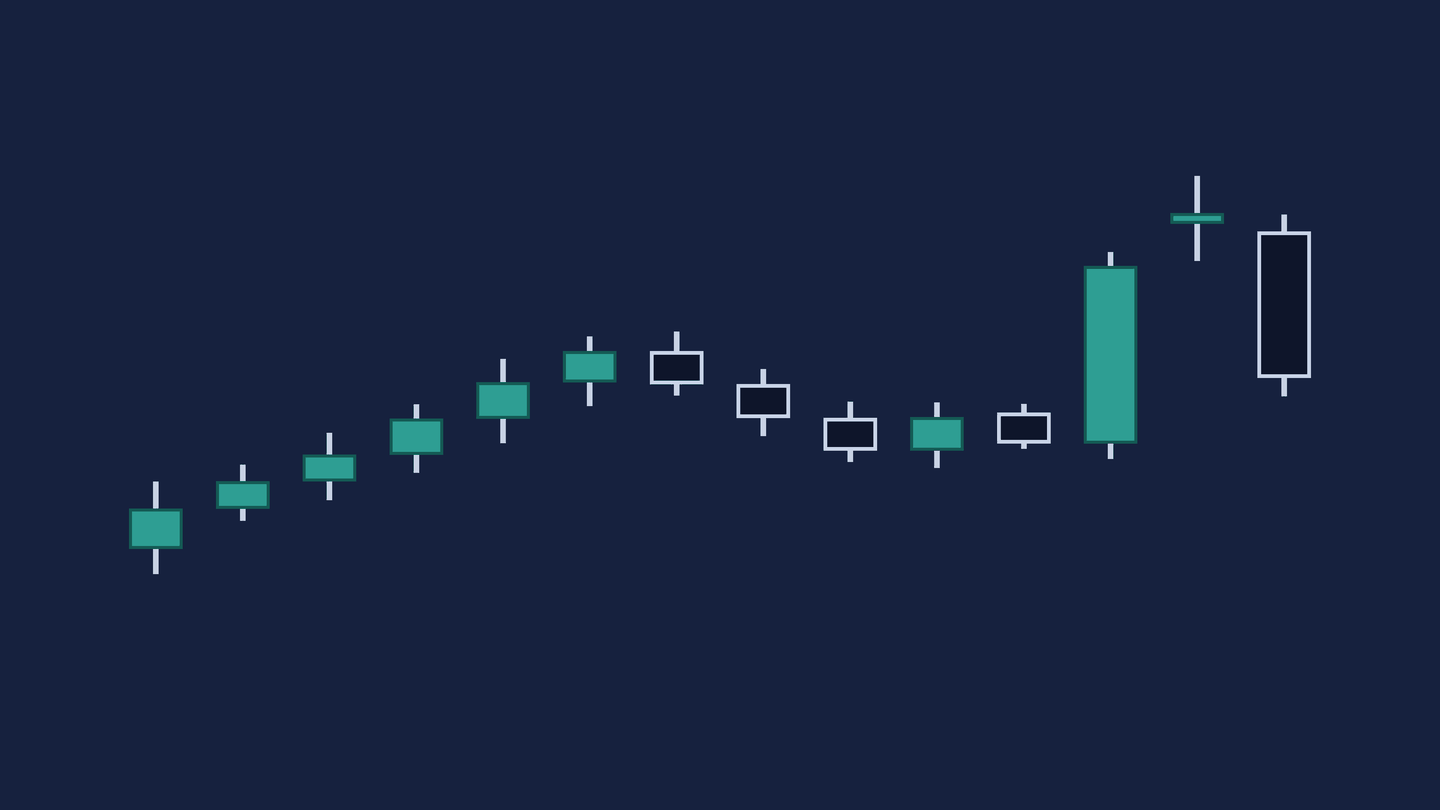
Evening star · candles twelve, thirteen and fourteen
Three candles: the tall teal push, then a small body that gaps clear above it, then a navy candle that closes deep inside the first one. The middle candle is the pause. It is not a small down candle and it does not have to be navy at all — what makes it the star is that it is small and it sits above.
This plate carries a trap earlier on, and you should have rejected it. Candle eleven covers most of the teal body before it but not the whole of it, so it is not a bearish engulfing. Nearly is not a formation. If you stopped there you took a shape for a rule.
The star is doubt printed at the top of a move. What follows it is the answer.
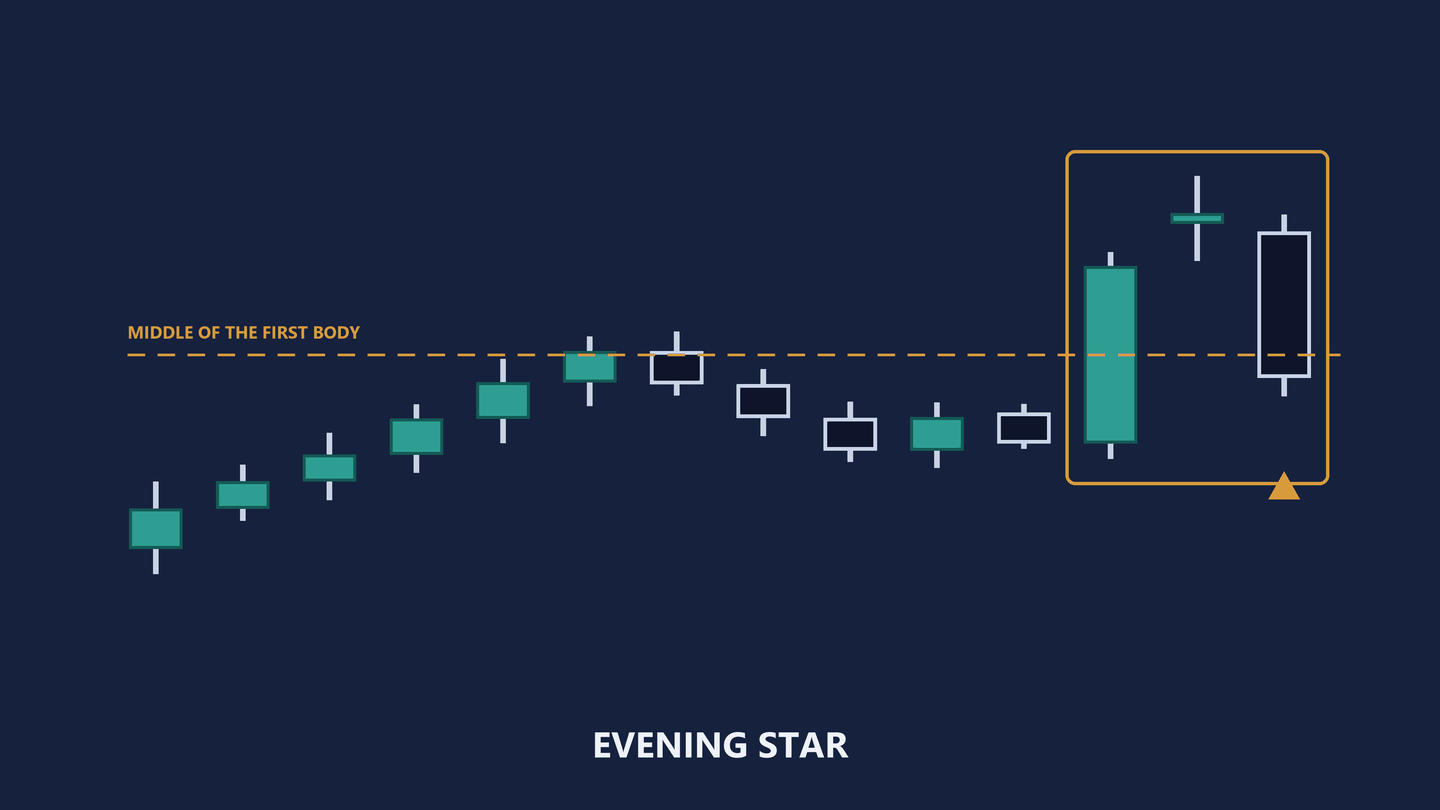
Diagram only · no instrument, no price, no outcome claimed
Drill 04 · thirteen candles
Show the answer
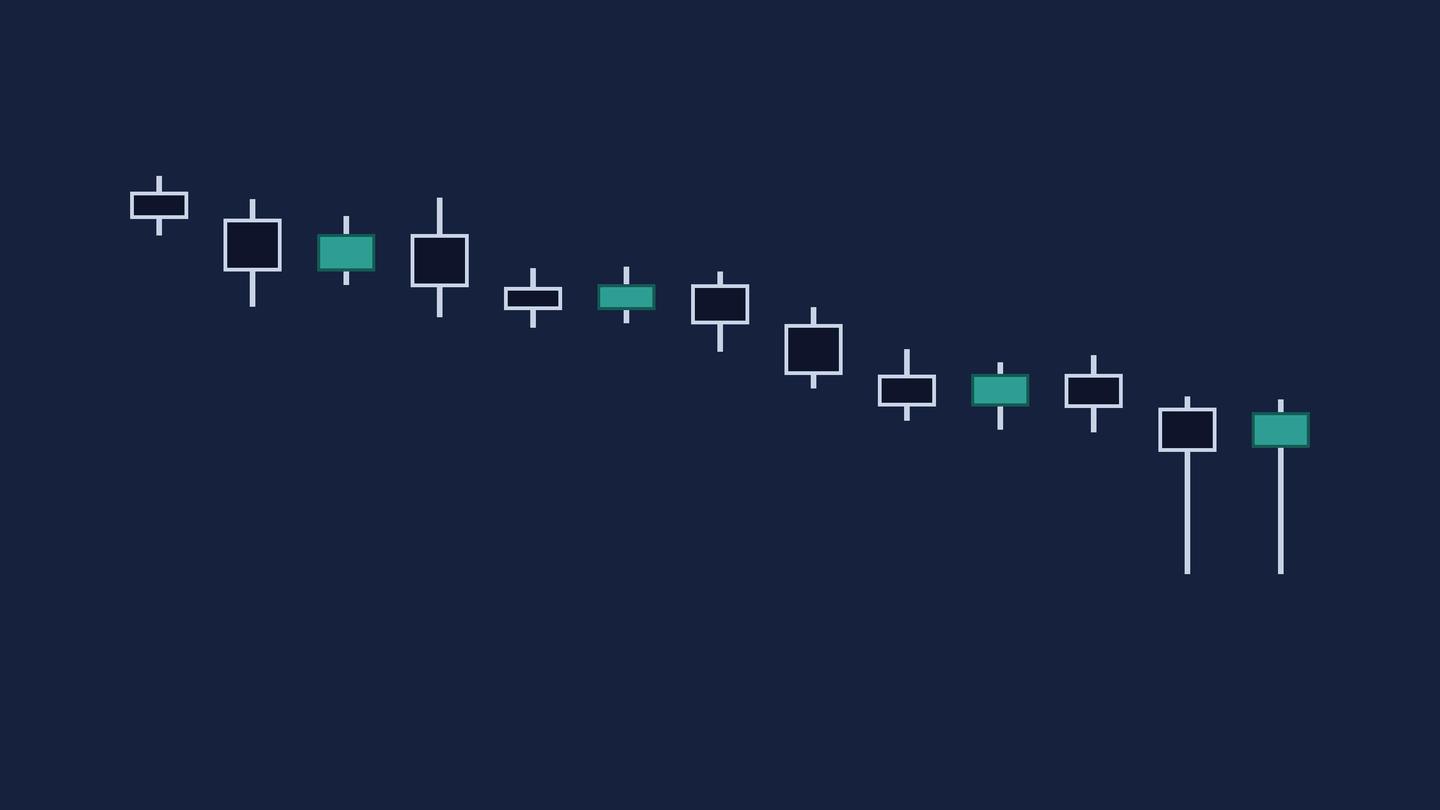
Tweezer bottom · candles twelve and thirteen
Two candles probing the same floor and being refused at it twice. The level is shared to the tick — that is the whole formation, and if the two lows are merely close it is not one.
The body colours do not matter here and the plate deliberately gives you one of each. What matters is the wick: at least sixty per cent of its own candle. If the bodies are the bigger half you are looking at two ordinary candles that happen to line up.
A shared floor is two attempts and two refusals at one price. That is worth more than one candle saying the same thing once.
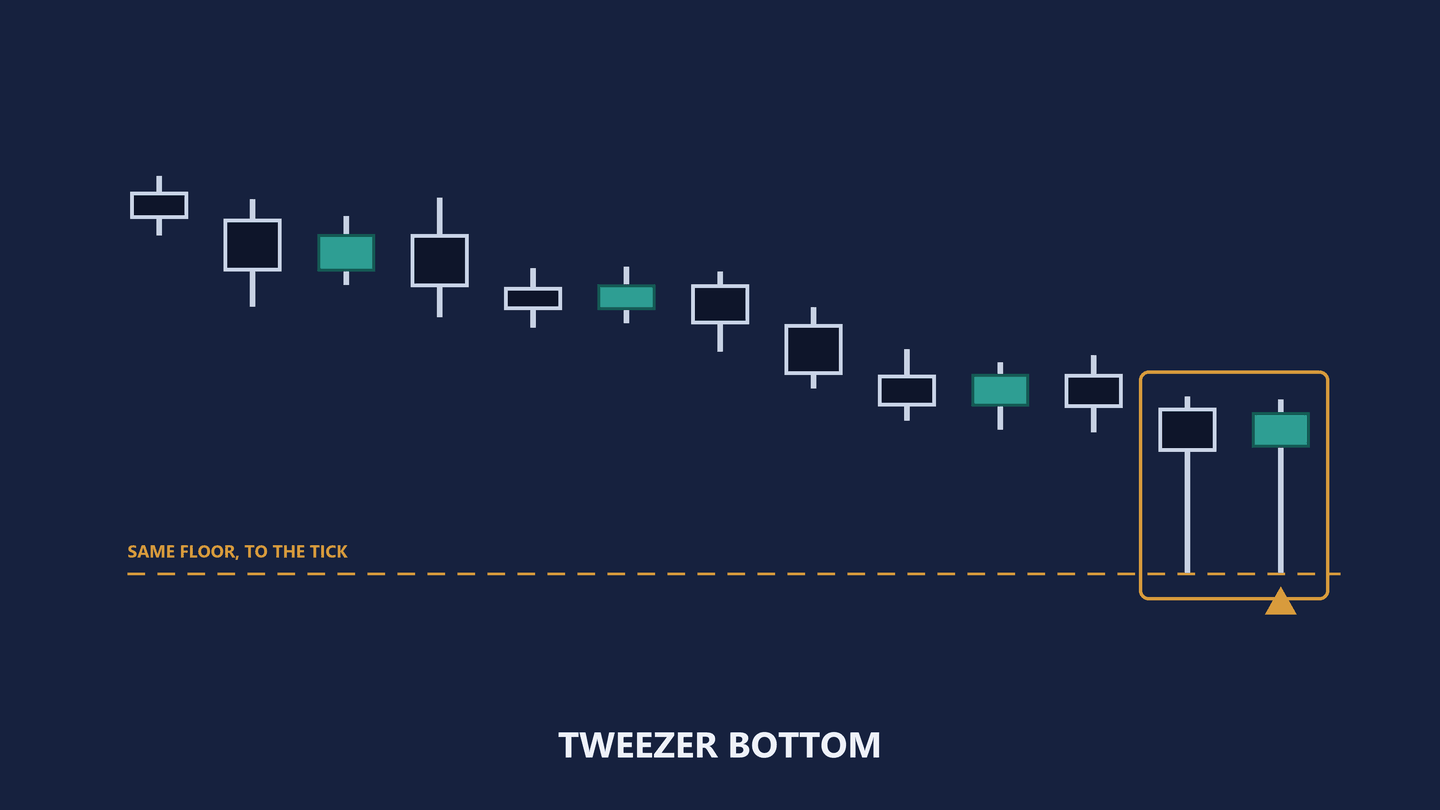
Diagram only · no instrument, no price, no outcome claimed
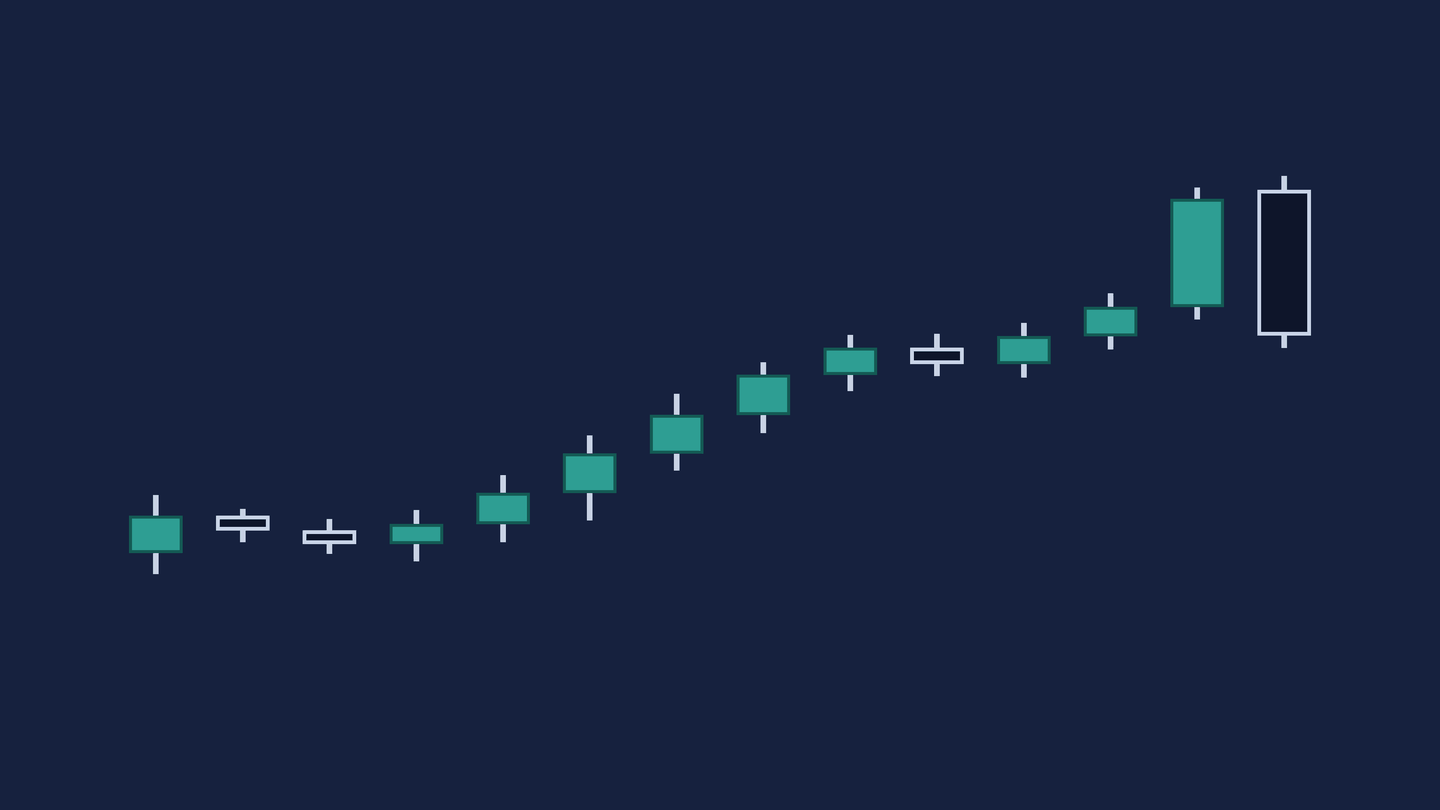
Drill 05 · fourteen candles
Show the answer
Bearish engulfing · candles thirteen and fourteen
The mirror of drill one, and the reason the two are in the same set. Candle fourteen opens above where thirteen closed and closes below where thirteen opened. The whole of the previous body is covered.
That last clause is the entire difference from a dark cloud cover. Drill one stopped partway down; this one goes all the way through. Same picture at a glance, different formation, and only the measurement separates them.
If you named drill one and drill five the same thing, go back and look at where each second body finishes. That comparison is what this pair is for.
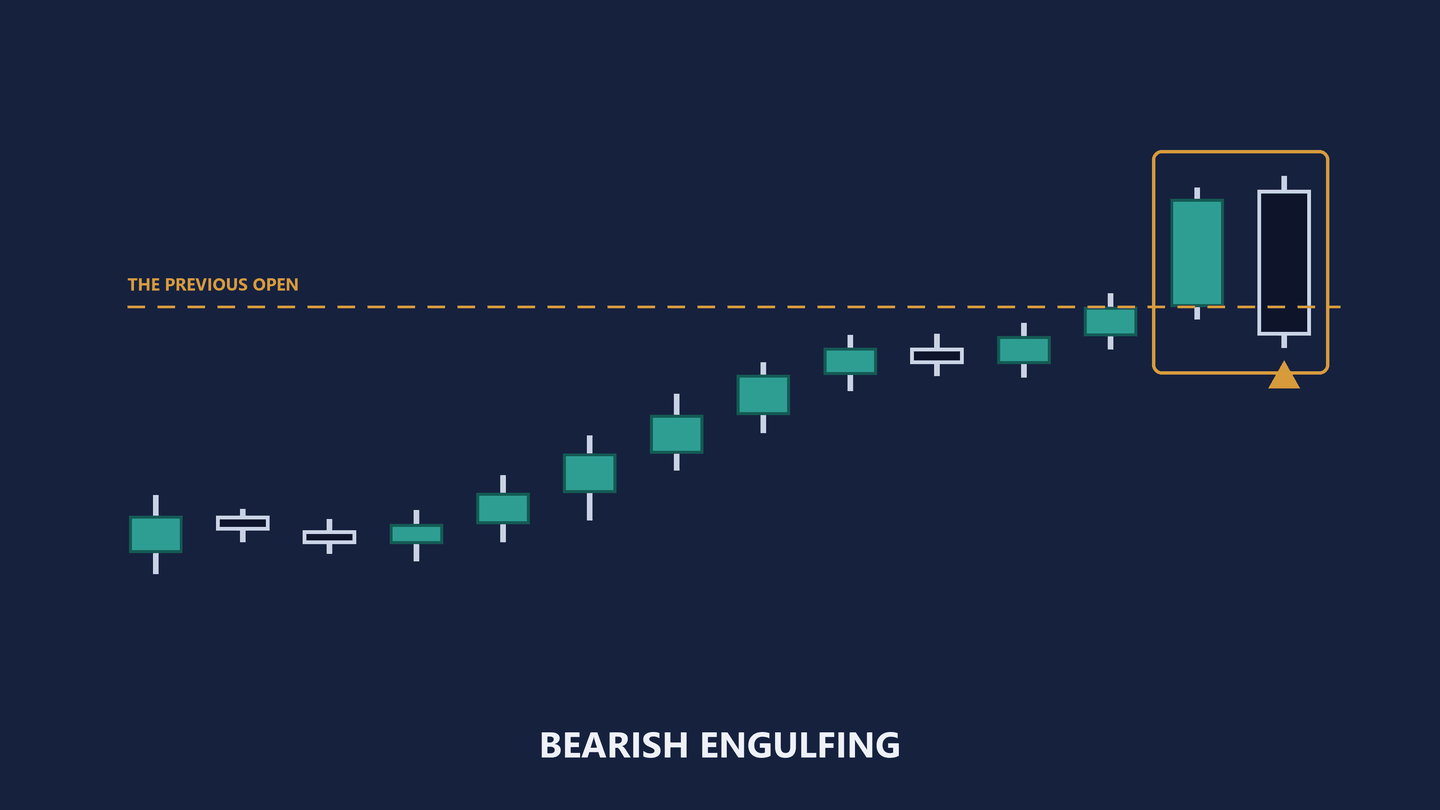
Diagram only · no instrument, no price, no outcome claimed
03 / Drills six to ten
Five more, and the second trap
The same instruction. One of these five carries the other near-miss, and two of them are single candles where the answer depends on where the candle printed rather than on what it looks like.
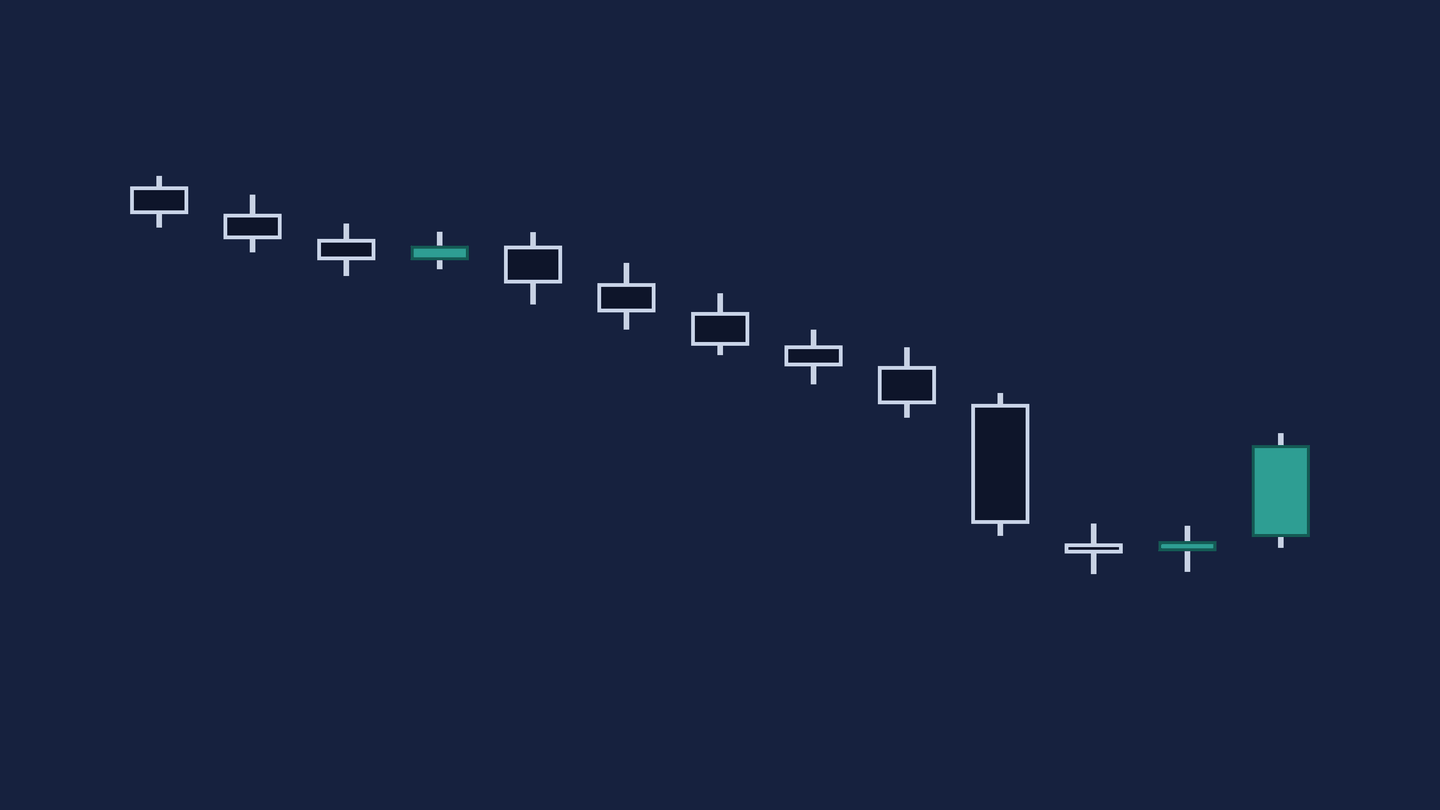
Drill 06 · thirteen candles
Show the answer
Morning star · candles ten through thirteen
Four candles, not three, and that is the point of this one. The star is a cluster: two small bodies where the textbook draws one. More than three candles is normal and it is not disqualifying.
What has to be true is the shape of the story. A decision down, a pause that goes nowhere, then a decision up that closes past the middle of the first candle's body. The middle of the body, again — the same measurement as drills one and three.
Three for three on the stars means you are reading formations rather than remembering pictures, and those are different skills.
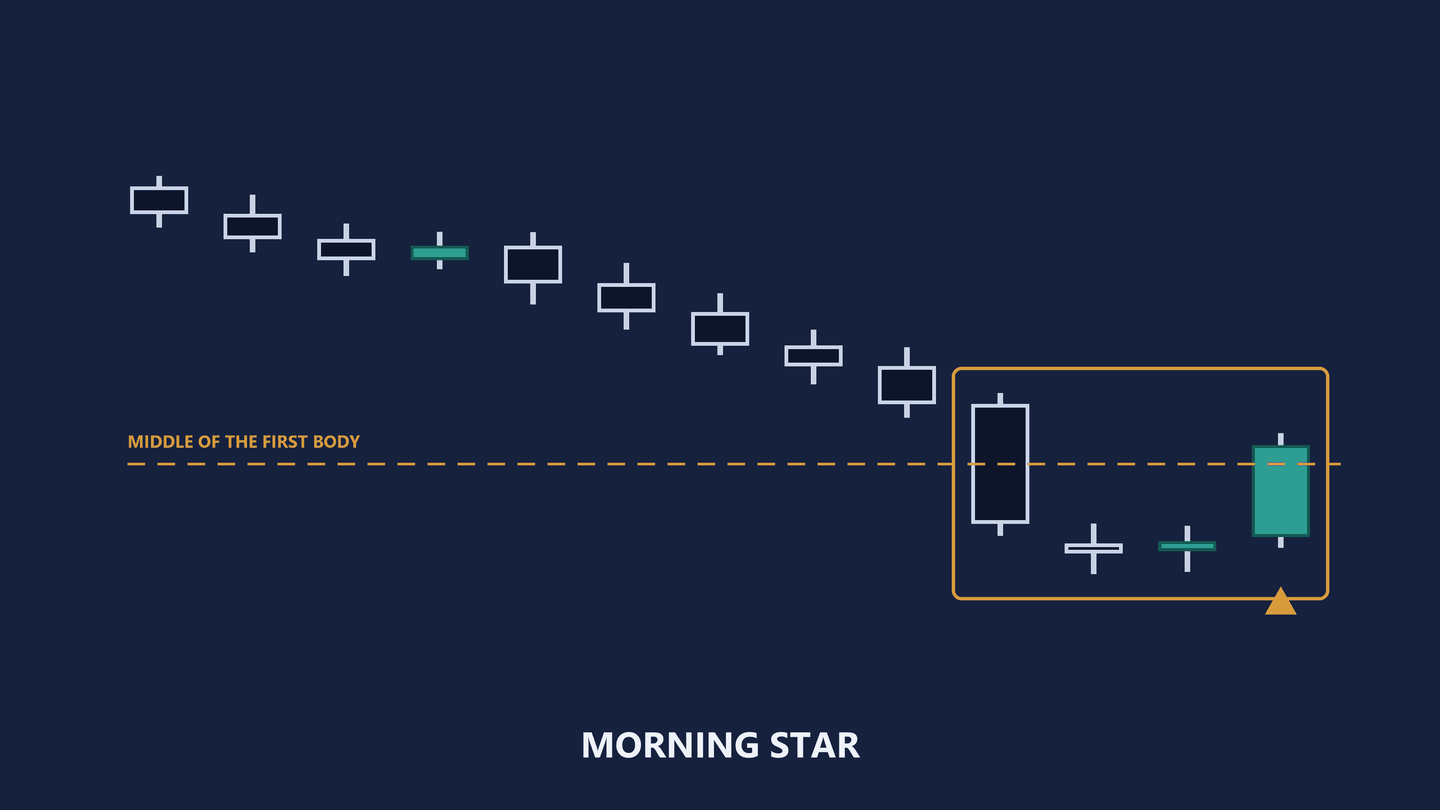
Diagram only · no instrument, no price, no outcome claimed
Drill 07 · fourteen candles
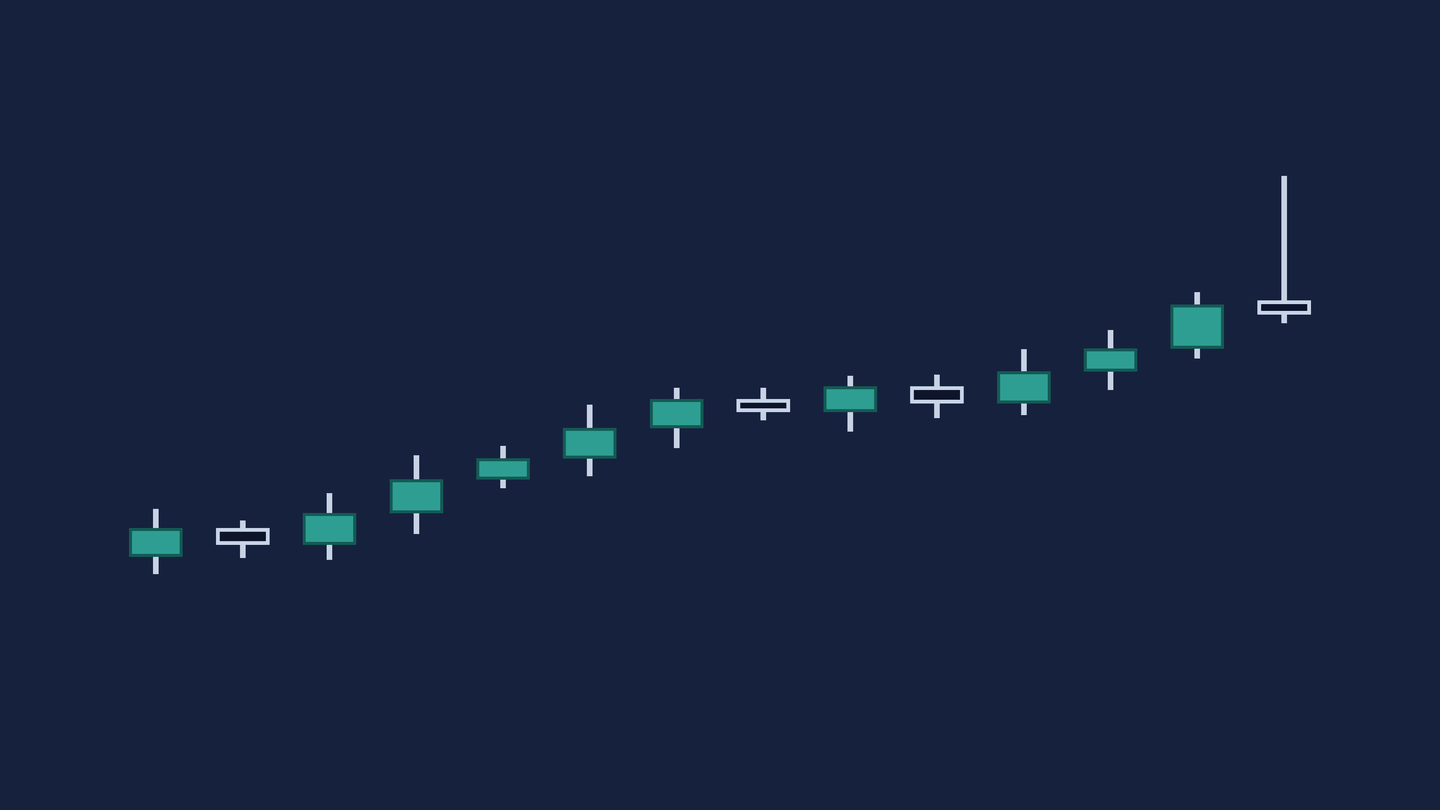
Show the answer
Shooting star · candle fourteen
One candle, not two. A long wick above a small body, and the body sitting at the low of the range — price was pushed up hard and gave all of it back before the candle closed.
At the end of a rally that is a shooting star. The identical shape at the end of a decline is an inverted hammer, and the shape alone cannot tell you which you are looking at. Where it prints decides what it means, which is why the run-in on this plate is not decoration.
It is one of the nine candles of doubt, so it is a warning and not an instruction. Nobody sells a rally on one wick.
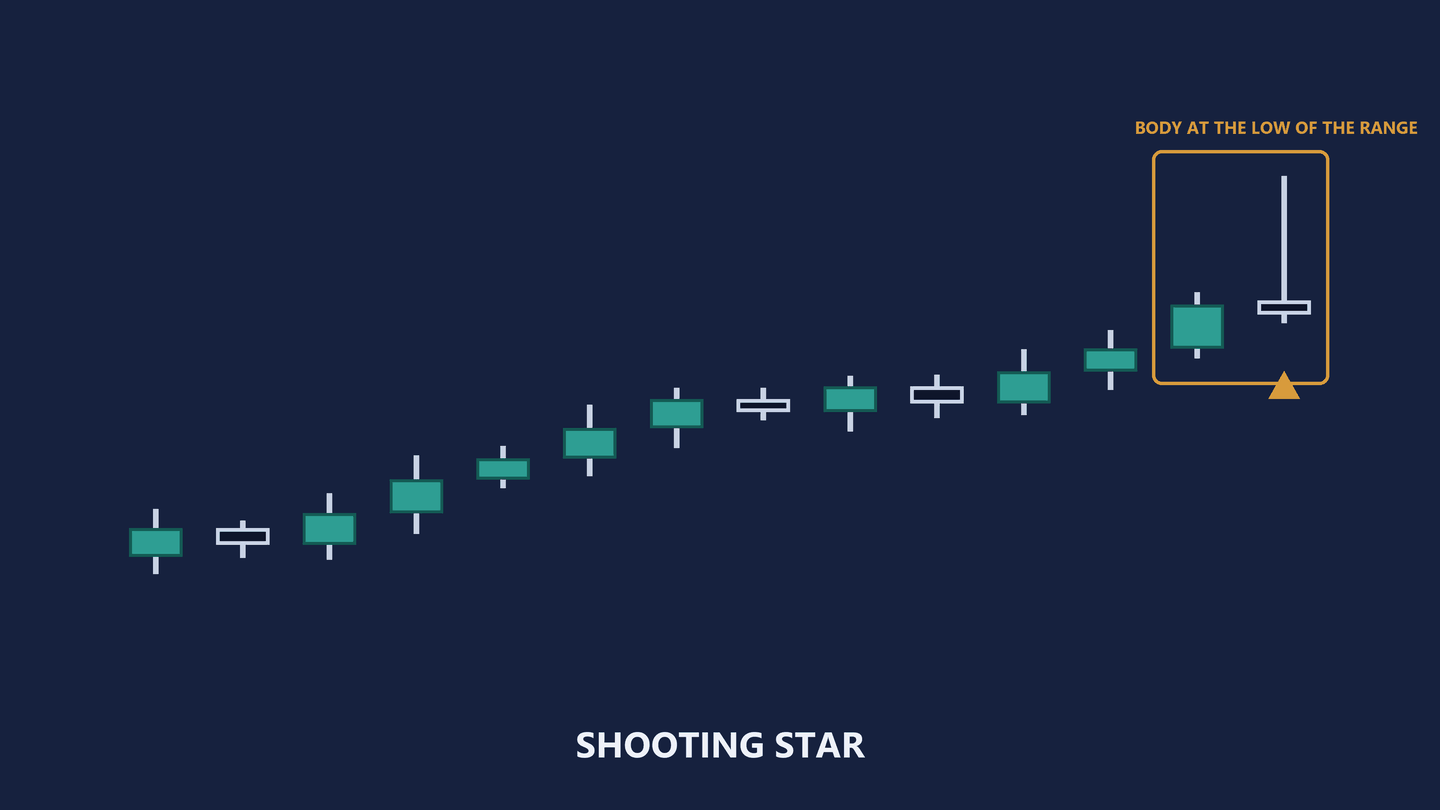
Diagram only · no instrument, no price, no outcome claimed
Drill 08 · fourteen candles
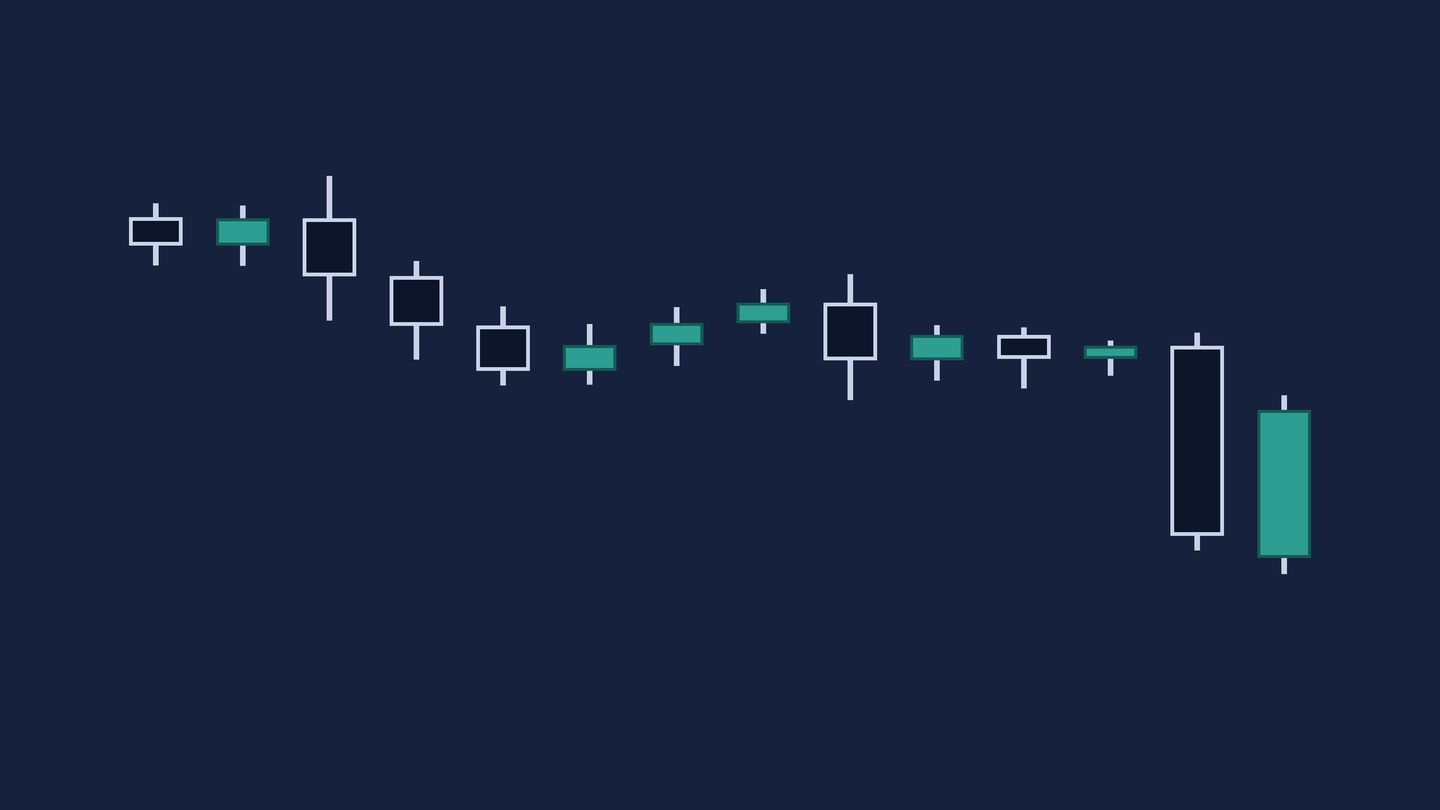
Show the answer
Piercing line · candles thirteen and fourteen
The mirror of drill one. A strong bearish candle, then a bullish candle that opens below it, pierces up, and closes above the middle of that bearish body — but below where it opened. Further above the middle, more warning.
This plate also carries the second trap in the set. Candles eleven and twelve both reach down to nearly the same level. Nearly is not a tweezer bottom. A shared floor is shared to the tick or it is two candles that happen to be close, and the difference is not a matter of judgement.
Dark cloud cover on top of rallies, piercing line underneath sell-offs. Same measurement, opposite ends of the chart.
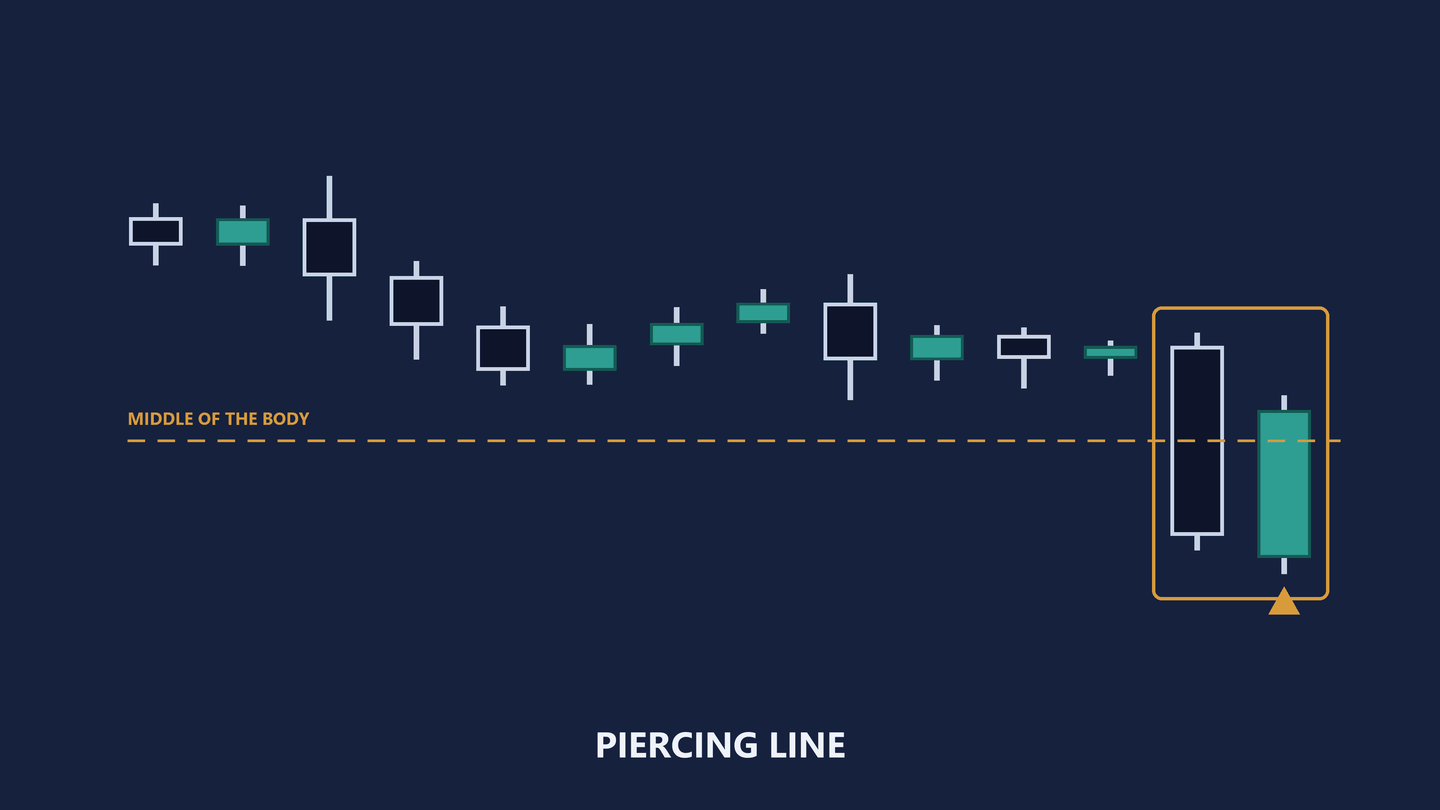
Diagram only · no instrument, no price, no outcome claimed
Drill 09 · fourteen candles
Show the answer
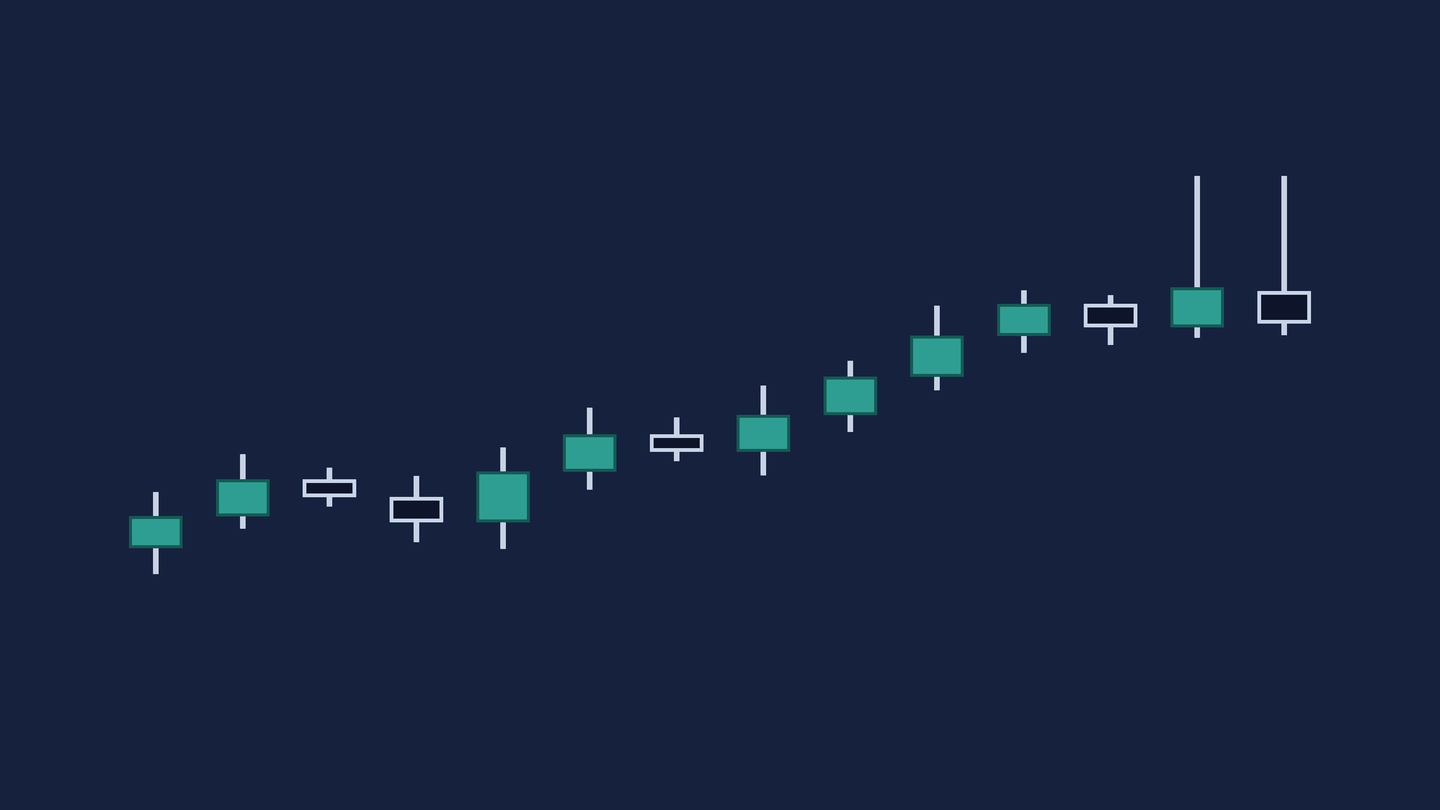
Tweezer top · candles thirteen and fourteen
Two prongs into the same ceiling. The rally reached a price twice and was pushed off it twice, and the two highs match to the tick.
The threshold from lesson three applies here as it did on the tweezer bottom: each of those upper wicks has to be at least sixty per cent of its own candle. If the bodies are the bigger half, it is two ordinary candles that happen to line up, and that is a coincidence rather than a formation.
Compare this with drill four. Identical logic, upside down, and both of them are about a price that was tested and held.
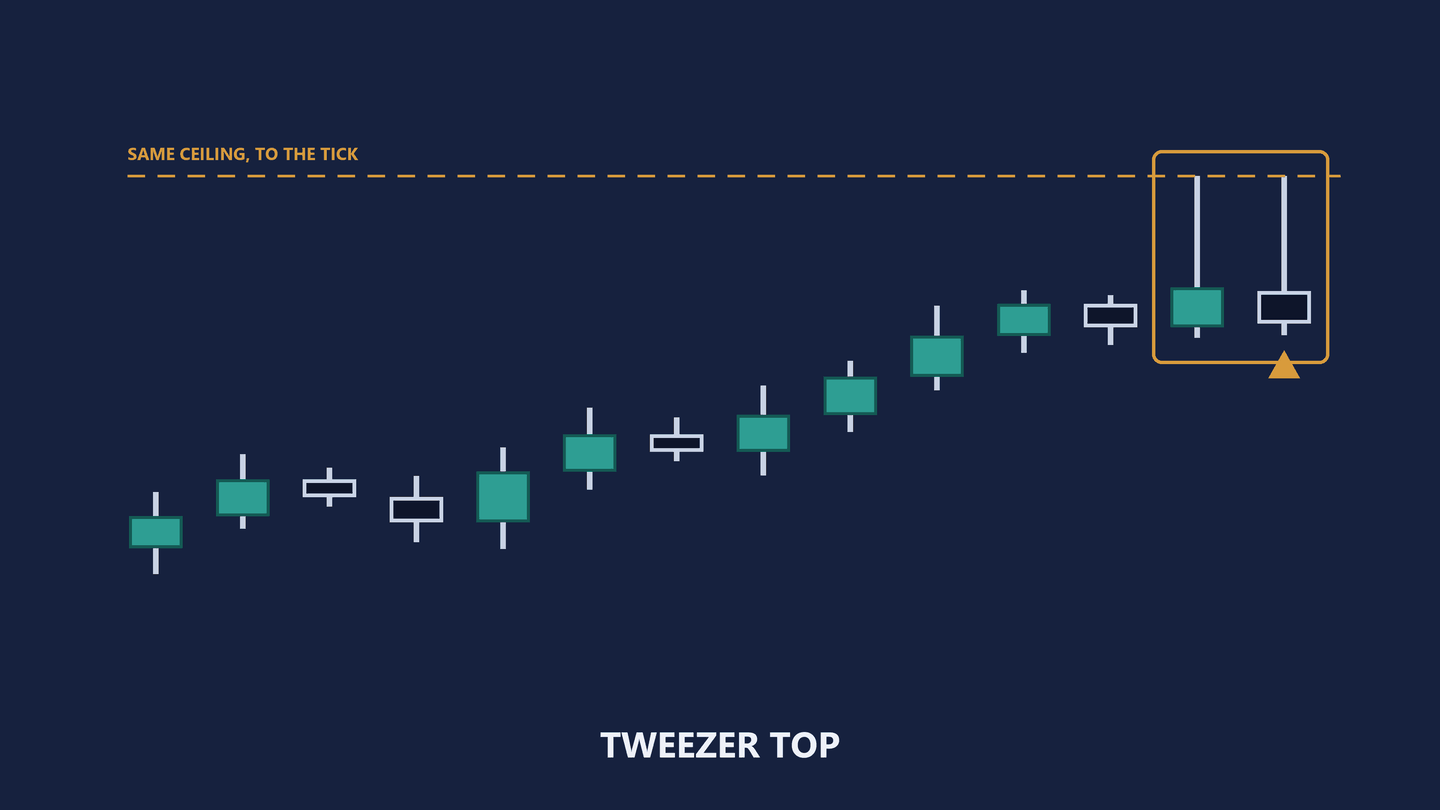
Diagram only · no instrument, no price, no outcome claimed
Drill 10 · fourteen candles
Show the answer
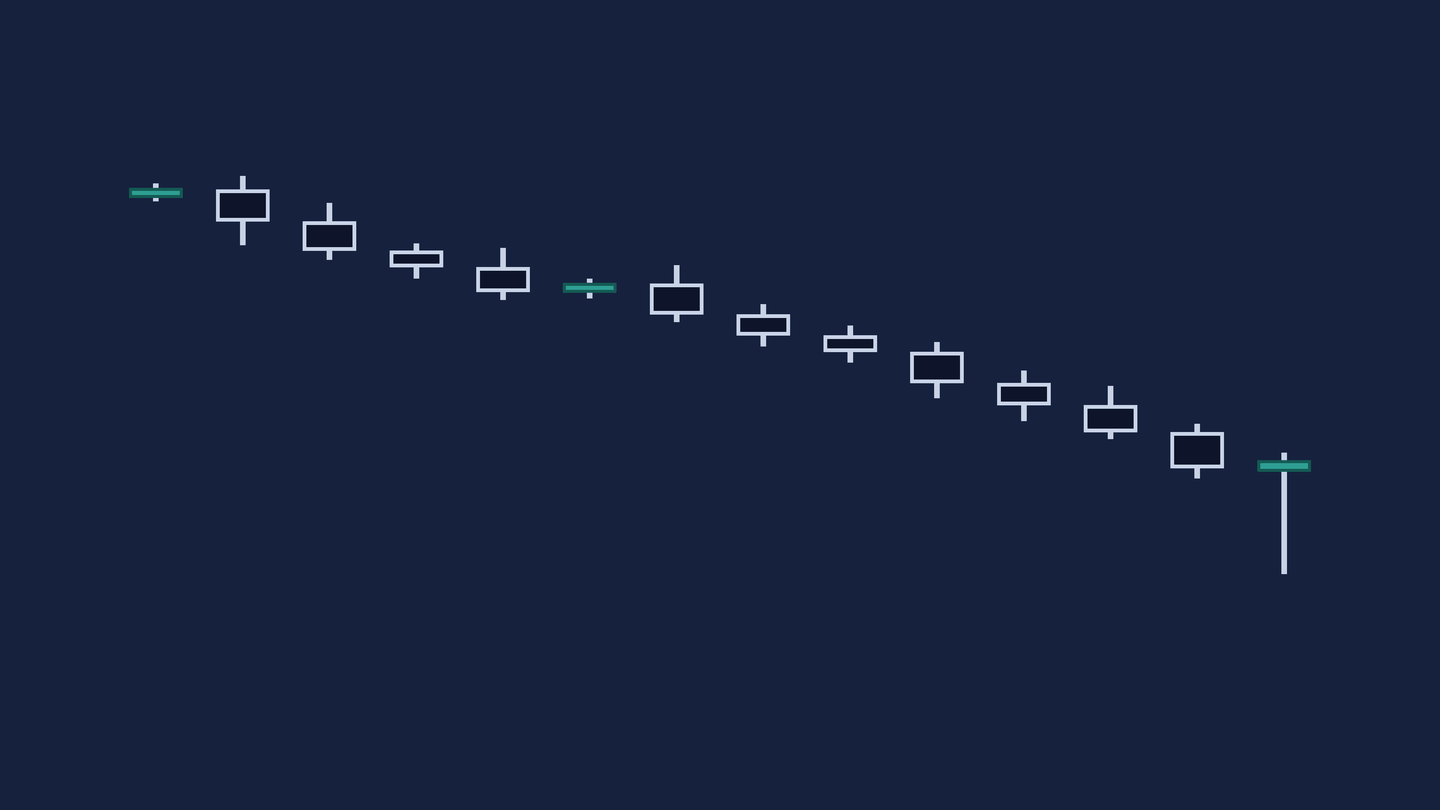
Hammer · candle fourteen
The mirror of drill seven. A long wick below a small body sitting at the high of the range: sellers took price down through the session and buyers dragged the whole of it back before the close.
At the end of a decline that is a hammer. The same shape at the top of a rally is a hanging man, and once again the shape does not tell you which. Only the location does.
That is the last drill, and it is the second time in ten that the answer depended on where the candle printed rather than on what it looked like. That is not a coincidence in the set, and it is the thread into the next lesson.
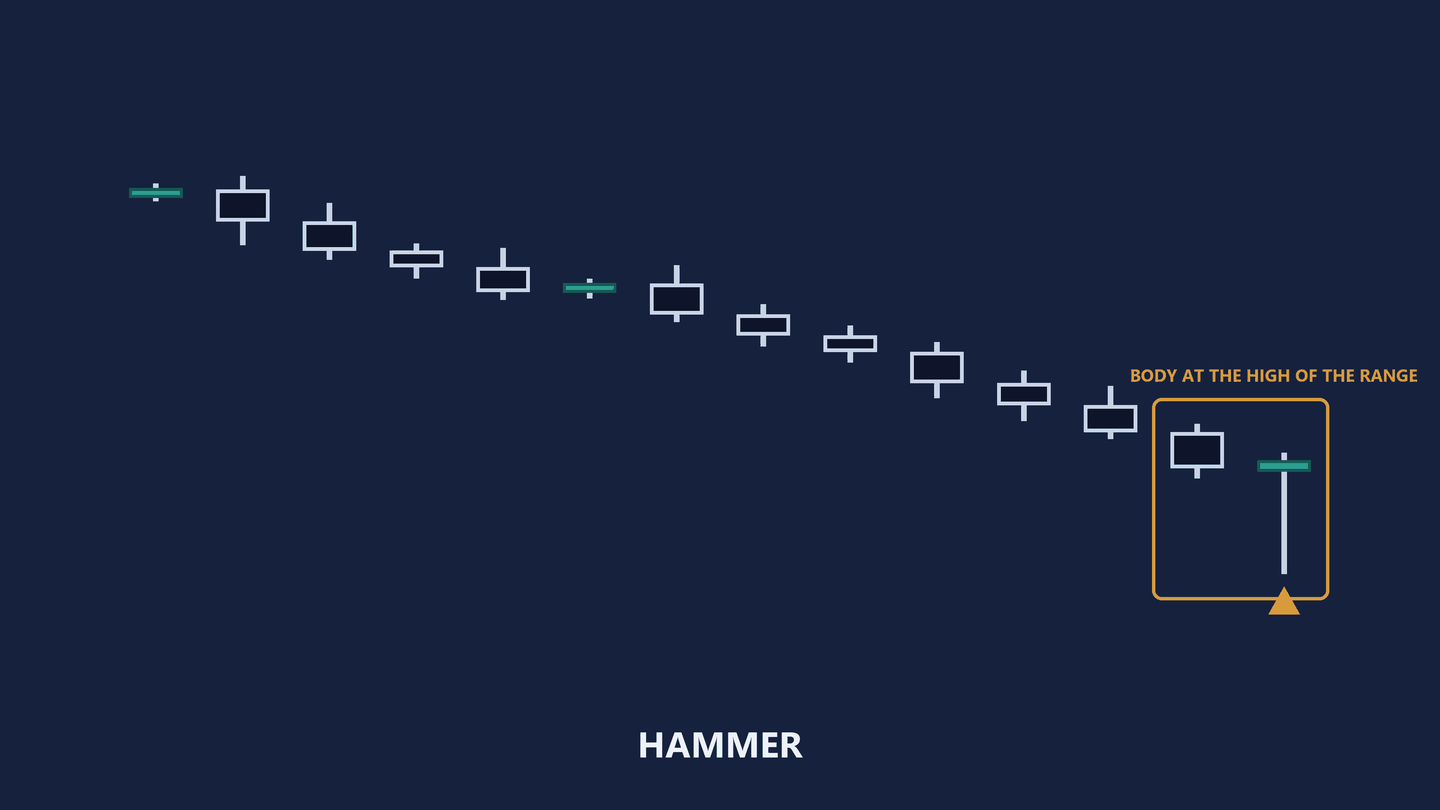
Diagram only · no instrument, no price, no outcome claimed
04 / After the drill
What the ten were actually testing
This section discusses the answers. If you have not worked through the ten yet, go back and do them — everything below is worth more after you have been wrong once, and it names which drills were which.
Not memory. Every name on this page was in lessons two and three, and you could have looked all ten up. What the plates test is whether you apply the measurement or settle for the silhouette, and those come apart in exactly two places.
The first is the pair. Dark cloud cover and bearish engulfing are the same picture until you ask where the second body finished; piercing line and bullish engulfing are the same picture upside down. If you named drill one and drill five the same thing, that is the most useful mistake available on this page, and it is worth going back for.
The second is location. A shooting star and an inverted hammer are one shape. A hammer and a hanging man are one shape. Nothing inside those candles tells you which one you are looking at — only what came before them does. Drills seven and ten were built so the run-in was the only thing that answered the question.
Which is the honest limit of everything in this course so far, and it is worth saying plainly at the end of a drill rather than hiding it in a footnote. A formation tells you that one side gave ground. It does not tell you whether the price it happened at is a price anyone defends. That is a different question, it is not answered by candles, and it is the next lesson.
Before that: do this on a chart nobody is trading. Open any instrument on any period, scroll back a few hundred candles, and mark every one of these you can find. You will call some of them wrong. Being wrong where it costs nothing is exactly how the recognition installs, and it is the only part of this lesson that does.
This lesson also exists as a video, published : Train Your Eye — Find the Pattern in 10 Seconds. The two are not the same experience. On video the clock runs and you answer or you do not; here you can stop on a plate, go back to lesson two, and argue with it. If the drill is the point, this page is the better version — but the video is the one that finds out whether you can do it at speed.
The course, all six lessons → Lesson three: the six formations →